

wow! I can’t believe it’s week 5 already. The summer is just flying by. We had fun making this dress today. We saw a similar dress in the quilt shop hop we did a few weeks ago and I knew I wanted to include a back tie dress in the sew~along. So we took the shirt out of the line up and put this one in. Because, really, any of these styles can be a shirt if you just make it short enough.
Supplies:
Pillowcase (or fabric)
Thread
Extra fabric for ruffle
7/8″ ribbon (optional)
Sewing machine
Scissors
Safety Pin
Iron (optional)
1. Make your own “pillowcase” (if using an already made pillowcase skip this step)


3. Make lining
4. Make armholes


Fold your dress in half longways. I wanted this dress to have a more angled look for the arms so I cut a triangle instead of a “J” that we’ve done on the other dresses. On the seam side you’re going to go about 4″ in and about 5″ down.

Turn the dress right side out and pin the lining to it. The lining will be wrong side out so that the patterned side of the fabric for the dress and the right side of the lining are touching.
Pin all around the armholes and front and back.
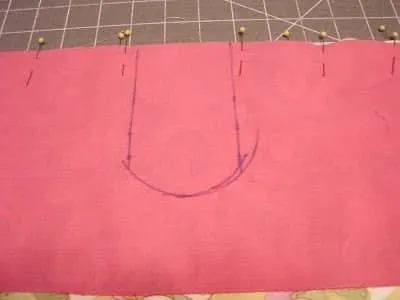
On the back of the dress find the center and mark an area that is about 2 1/2″ wide and about 5″ long and round it off. I used a ruler and a coffee mug to draw this. I also used a disappearing ink pen.
Stitch the entire area that you pinned. When you get to the markings you are going to stitch right on the lines.


After stitching the lining to the dress cut out the part on the back leaving about a 1/4 seam allowance.


Cut little notches in the curve on the back. This will help the curve lay flat.


Cut little notches in the armholes near the bottom of the “v”. This will help it lay nicely.


Turn the lining to the inside of the dress and iron. This is what the back should look like. See how the curve lays flat? That’s from the notches.


Do the same for the 2 back sections.
If you used a pillowcase you’re done! Unless of course you want to add some embellishments. If you didn’t use a pillowcase keep going.
7. Make the ruffle


Cut a piece of fabric that is 6″ by about 4 times the width of your dress. So for my dress I cut 2 rectangles that were 22″ wide so the my ruffle was 6″ by 88″. I sewed two pieces of fabric together to get them this long.
Once they are sewn together fold it long ways and iron a fold. So now your ruffle is 3″ by 88″ (or whatever you cut it to).
Now, open it back up and stitch the other side together. So now you have a tube that you can fold and it will be 3″ wide instead of 6″ wide.

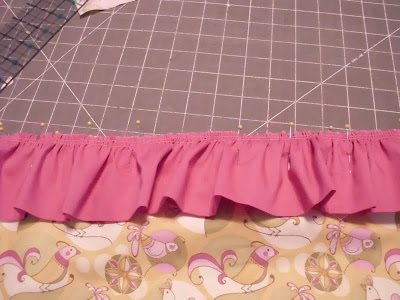

Pin the ruffle to the bottom of the dress using your side seams as your guides and distribute the gathers evenly. This doesn’t have to be perfect you just don’t want one side to have lots of gathers and the other side to be straight.


Stitch the ruffle to the dress and then zig zag the raw edges.


Turn the ruffle down and making sure that the seam is against the dress topstitch the dress. Remember, topstitching is just sewing close to the edge. This will keep the seam from being bulky.
8. Enjoy


Esther’s getting the hang of this modeling stuff, don’t you think?


Here’s the back.
Let me know if I need to clarify anything.
Jessi Wohlwend
Friday 20th of July 2012
Way cute! I'm loving all of these dresses :-) Thanks for sharing this at The Fun In Functional!
Glo @ Off The Grid at -30
Tuesday 17th of July 2012
This is so cute! Please consider sharing on my first blog hop. http://offthegridat-30.blogspot.ca/2012/07/frugal-i-made-it-tuesday-1.html
SchneiderPeeps
Wednesday 18th of July 2012
Thanks Glo, I'll check it out.
Rachel E.
Friday 13th of July 2012
Looks so simple to me. You must be having fun.
SchneiderPeeps
Wednesday 18th of July 2012
It was so simple and we are having fun. Esther is so funny with the dresses. I hadn't intended for her to get 6 new dresses but I think she might end up the the majority of them.